
Devices & Activity
The Devices page (/devices) is where your layout meets its hardware. It shows whether your DEJA Server is online, lists every registered device with a live status, lets layout owners add and connect devices, and holds My Layouts for switching, creating, and joining layouts (see Connect). Old /connect links land here. Everything you need to see what your layout is doing lives here — device serial logs, the Activity feed, and the access-code kiosk — free on every plan, from any network.

Each device represents a physical piece of hardware — a DCC-EX EX-CommandStation, an Arduino Mega, an ESP32, a Raspberry Pi Pico W, or a WLED controller — connected to your DEJA Server over USB or WiFi (MQTT or WebSocket). The server bridges them to DEJA Cloud, the sync service that keeps every app in step.
Connecting Your Server
The server band at the top of the page shows whether your DEJA Server is online — and when it's offline, it shows the deja start command with a copy button plus install and troubleshooting links. To link a server to your layout:
- On the server machine, run
deja login. The CLI prints a short one-time code and opens Throttle's Connect Server page (/cli-login) in your browser. - Check the code matches your terminal, pick the layout to connect, and click Authorize. (You can deny the request if you don't recognize it.)
- The CLI finishes on its own, and the server stays signed in from then on — it renews its own credentials automatically.
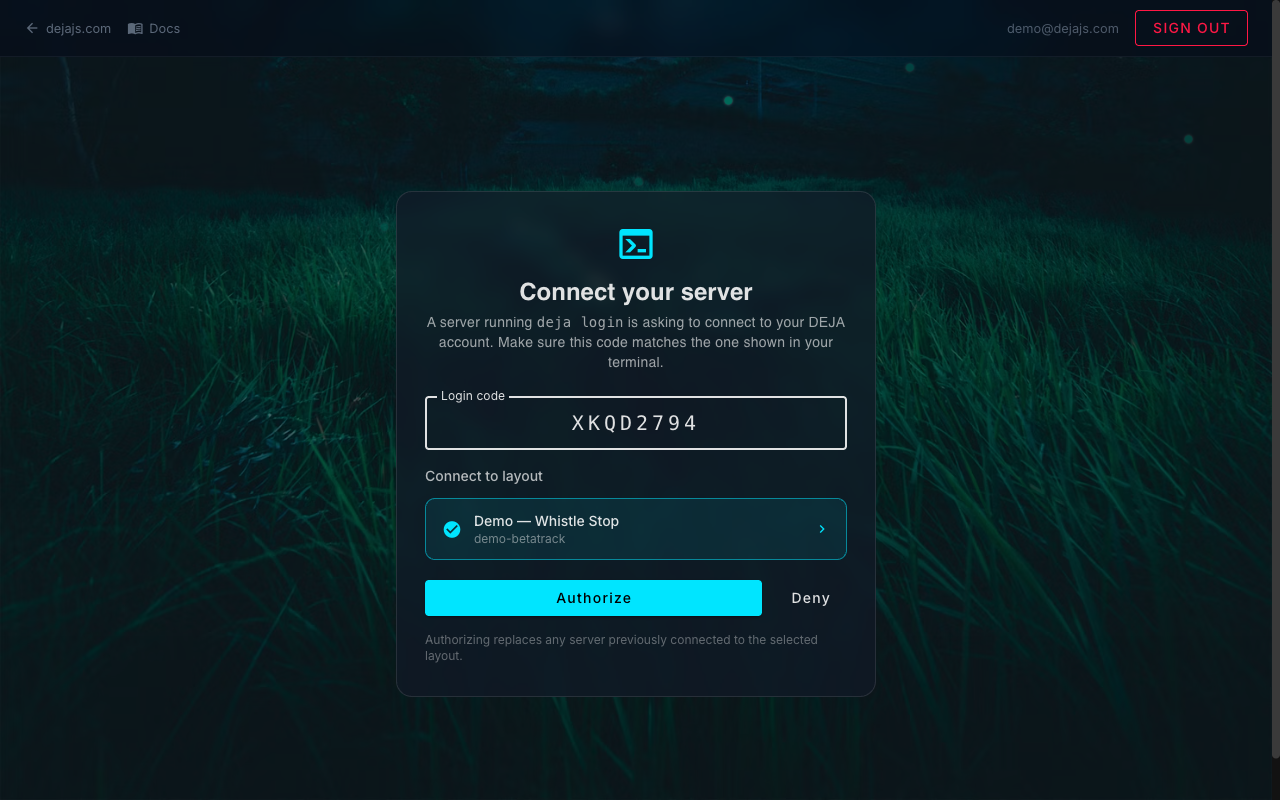
To move your server to a new machine, run deja login on the new machine — authorizing it replaces the server currently connected to that layout, so the old machine stops syncing on its next restart.
Device Status
Every device row shows an honest, evidence-based status:
- ● VERIFIED (green) -- The server has real proof the device is alive: an open serial port for USB devices, actual traffic for WiFi devices.
- ◐ LINKED (amber) -- Linked, but the device hasn't spoken recently — awaiting its first message.
- ◌ WAITING (gray) -- The DEJA Server itself is offline, so no device can truly be connected.
- ○ OFFLINE (gray) -- Device is not reachable. Check the cable, power, and server status.
Your EX-CommandStation always sorts first. On phones, the table collapses to simple two-line rows.
Adding a Device
Layout owners register hardware with the Add device form on this page. Specify:
- Device ID -- A unique identifier (e.g.,
commandstation-1,turnout-board-east). - Device Type -- One of the supported types:
dcc-ex-- DCC-EX EX-CommandStation (USB serial)deja-arduino-- Arduino Mega 2560 IO board (USB serial)deja-arduino-led-- Arduino-based LED controller board (USB serial)deja-esp32-- ESP32 IO board (USB serial, same sketch asdeja-arduino)deja-esp32-wifi-- ESP32 IO board (WiFi — MQTT or WebSocket)deja-mqtt-- Raspberry Pi Pico W IO board (WiFi — MQTT or WebSocket, CircuitPython)deja-mqtt-diy-- Custom/DIY MQTT devicedeja-server-- Your DEJA Server itself, pinned to the top of the listwled-- A WLED-controlled LED strip (see WLED Scenes)
- Connection -- USB serial or WiFi. Auto-defaulted from the device type —
deja-esp32-wifianddeja-mqttdefault towifi, everything else tousb. - Transport -- For
deja-esp32-wifianddeja-mqtton WiFi: MQTT (the default) or WebSocket, where the device dials the DEJA Server directly atws://<server>:8082/devicewith its own token. You can change it later from the device editor; the choice is baked into the firmware, so rundeja deployafter changing it (see Protocol Details). - Port -- The serial port path (for USB devices, e.g.,
/dev/ttyACM0). - Topic -- The MQTT topic prefix (for WiFi devices, default
DEJA). - WiFi / MQTT credentials -- For
deja-esp32-wifianddeja-mqtt, fields for SSID, password, and broker IP that get baked into the firmware at deploy time.
📟 See Arduino & ESP32 Setup and Pico W Setup for the firmware setup steps for each device type.
Adding a device that changes firmware config shows a reminder to restart your DEJA Server so the change takes effect.
Connecting a Device
- Tap a device's row (or its Connect button — shown for USB and WLED devices when offline).
- In the side panel, choose the serial port (auto-detected from available USB ports) or the WLED host address.
- Tap Connect — the row's badge turns green when the link is verified. WiFi devices (MQTT or WebSocket) skip all of this: they announce themselves and connect automatically.
Device Details
Tap a device's row, then Device details, to open its page at /devices/:deviceId:
- Status -- connection kind, a live health badge, and a Connect form (serial port or WLED host), plus Auto Connect and track power for an EX-CommandStation.
- Console and log -- the full DCC-EX console for an EX-CommandStation, and a live serial log for other devices.
Device serial log
Each device's detail page has a live serial log: lines the server sent to the device and lines the device sent back, newest first. It streams through DEJA Cloud only while the log is open (see Remote Monitoring). EX-CommandStation logs open with recent history from the command log.
Editing a Device
Layout owners get an Edit button on the device page that opens the device editor (/devices/:deviceId/edit):
- Assigned turnouts, effects, sensors, and signals -- tables of everything wired to this device, with index, name, pins, type, and state.
- Pinout -- a pinout diagram for supported boards, plus advanced Arduino settings.
- Track outputs -- track output configuration for an EX-CommandStation.
- WLED -- host address, LED count, and saved scenes (see WLED Scenes).
- Developer configuration -- the generated firmware configuration for DCC-EX, DEJA Arduino, ESP32, and Pico W devices, with per-file downloads and the exact PlatformIO and Arduino CLI build/upload commands that
deja deployruns. The generated config includes the device ID, feature flags derived from its assigned turnouts and effects, servo PWM constants, output, signal, and sensor pin arrays, and the turnout pulser setup. - Delete device -- at the bottom of the editor. Deleting is blocked while the device is still referenced by any turnout, effect, signal, or sensor; unassign those first.
See Arduino & ESP32 Setup, Pico W Setup, and Deploy & Flash for the full firmware walkthroughs.
Activity
The Activity button on the Devices page opens /devices/activity: a live feed of turnout, effect, signal and sensor changes, one tab per kind, newest first, with the entity's name, its new state and the time. The tiles at the top count your locos, turnouts, effects and signals. Clear empties the tab you're looking at; the feed keeps the latest 200 changes per kind while the page is open.
Access-code kiosk
/access-code shows your layout's rotating 2-digit Room Code full-screen with a countdown to the next one — put it on a spare tablet near the layout. Guests type it on the join page when Require Code is on (see Access & Inviting People). Only the layout owner can display it.
WLED Scenes
WLED devices keep their scenes in the device editor. A scene is a saved WLED animation config -- brightness, transition time, and one or more LED segments, each with an effect, palette, colors, speed, and intensity.
- Save a scene -- Build a segment configuration with the segment editor, name it, and save it as a scene on the device.
- Activate a scene -- Tap a saved scene to apply it to the physical strip.
- Power toggle -- Turn the WLED strip on or off independently of which scene is active.
- Delete a scene -- Remove a saved scene you no longer need.
During a session, scenes are activated from the Effects page's WLED tab -- one card per WLED device, with the same power toggle and scene buttons.
Serial Ports
The serial ports your DEJA Server detects are listed under Settings → Layout → USB Ports — handy for finding which port your EX-CommandStation is on (e.g. /dev/ttyACM0, /dev/ttyUSB0, or COM3 on Windows). They update automatically when the server sees a USB device plugged in or removed.
Troubleshooting
- No ports available -- Make sure your EX-CommandStation is plugged in via USB and the DEJA Server is running. Re-scan the ports and try again.
- Connection drops -- Check USB cable quality. The server will auto-reconnect on brief interruptions.
- Multiple devices -- Each device connects independently. You can have a DCC-EX EX-CommandStation and IO boards connected simultaneously.
Related Pages
- Connect -- My Layouts, joining, and sign-in.
- DCC-EX Console -- Send commands once connected.
- Deploy & Flash --
deja deploybuilds and flashes a device from this configuration. - Server Troubleshooting -- When the server band stays offline.